How to Use AWS Nitro Enclaves Attestation Document
#nitro-enclaves #petIn my last blog post Running Python App on AWS Nitro Enclaves, I briefly introduced what AWS Nitro Enclaves is and also demonstrate how network connection works on Nitro Enclaves.
This week, I am going to talk about how we can make use of attestation document generated by Nitro Secure Module (NSM).
Common Scenario
AWS Nitro Enclaves is an isolated compute environments that can securely process highly sensitive data. When communicating with other components outside the enclave (e.g. Central secret store), we also want this process as secure as possible. The 2 main concerns are:
-
How does the outside component know if it is communicating with the correct enclave image but not an attacker impersonating the enclave?
-
How can we secure the data transmitted between the enclave and the outside component?
To tackle the issue, AWS Nitro Enclaves provides an attestation mechanism, its detail is provided in AWS documentation. But to understand it more easily, I created a Python demo for you to have a hands-on experience. richardfan1126/nitro-enclave-python-demo
The Components
-
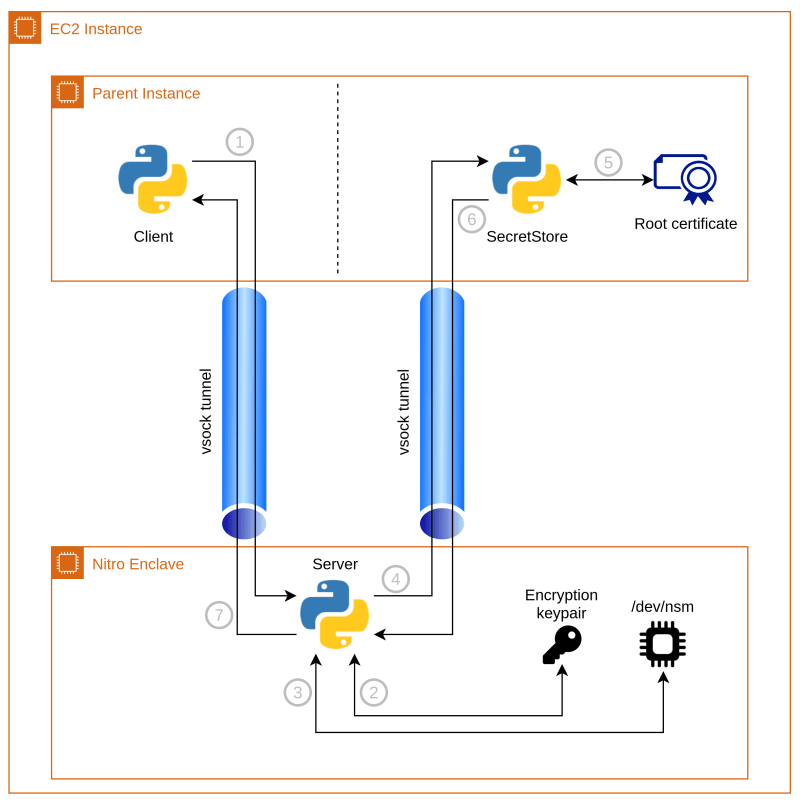
Client
This is to simulate generic components that rely on the output from the secure process. For example, a website, which supports SSO, needs to know if the user has been authenticated or not.
-
Server
This is to simulate the process that handles sensitive data. In the previous example, it would be the SSO authenticator, which has access to the OAuth App secret to do the authentication.
-
SecretStore
This is to simulate the central database storing the secrets. In the previous example, it would be the database that stores the App secret of different SSO providers.
However, for simplicity, the demo would not perform any process on the secret as it is not our focus. It would just pass the secret plaintext to the client.
The Process
1. Client sending request
The user first runs the client app and send the request to the server app. This part is as simple as sending a JSON string through the vsock channel
2. Server generating encryption keypair
When we start the server app, it will generate a random RSA keypair. The public key will be sent over to the SecretStore on every request. It is used to encrypt responses from the SecretStore to the Server so that only the Server can decrypt and get the actual content.
To generate a random key, most software relies on/dev/urandom to generate random values. This feature is not available inside AWS Nitro Enclaves, but luckily, Luc van Donkersgoed solved this issue in his NitroPepper project by instructing Crypto python package to use the random value generator provided by the NSM. You can read his blog post for more detail.
@classmethod
def _monkey_patch_crypto(cls, nsm_rand_func):
    """Monkeypatch Crypto to use the NSM rand function."""
    Crypto.Random.get_random_bytes = nsm_rand_func
    def new_random_read(self, n_bytes):
        return nsm_rand_func(n_bytes)
    Crypto.Random._UrandomRNG.read = new_random_read
3. Generate attestation document
The attestation document is generated by the NSM, AWS has already implemented an SDK (written in Rust) to perform the request. Again, thanks to Luc van Donkersgoed, he has modified the code and makes it usable in Python.
def get_attestation_doc(self):
    """Get the attestation document from /dev/nsm."""
    libnsm_att_doc_cose_signed = libnsm.nsm_get_attestation_doc(
        self._nsm_fd,
        self._public_key,
        len(self._public_key)
    )
    return libnsm_att_doc_cose_signed
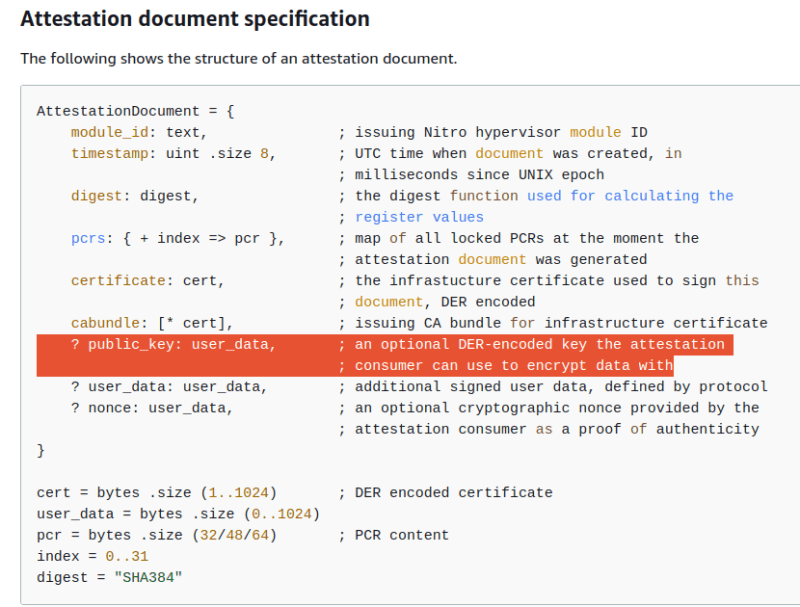
The attestation document has an optional field public_key for the consumer to encrypt data with. In our case, we will put the public key generated in step 2 into this field (through the 2nd parameter of nsm_get_attestation_doc), which will be used by the SecretStore.
There is an optional field public_key in the attestation document
The attestation document is encoded as Concise Binary Object Representation (CBOR), which is in binary data form. We will do a base64 encode so that we can put it inside the request payload.
# Base64 encode the attestation doc
attestation_doc_b64 = base64.b64encode(attestation_doc).decode()

# Generate JSON request
secretstore_request = json.dumps({
    'attestation_doc_b64': attestation_doc_b64
})

# Send the request to secretstore
secretstore_socket.send(str.encode(secretstore_request))
4. Send the request to SecretStore
In our demo, because everything is inside the same instance, we are sending the request from Server to SecretStore purely through the vsock channel.
But in real life, the SecretStore is most likely sitting elsewhere. To make connections outside the instance and avoid in-transit data being read by attackers, I recommend using HTTPS. For how to make HTTPS connection from the enclave, you can follow my previous demo on http-proxy.
5. Validating attestation document
To validate the attestation document, we will do 3 things:
-
Match the PCRs — To check if the request is generated by the desired enclave image.
-
Validate signature — To ensure the integrity of the request, i.e. the request has not been modified.
-
Validate the certificate — To ensure the request is signed by a valid certificate under the AWS Nitro Attestation Public Key Infrastructure (PKI). It is done by validating the certificate against the root certificate provided by AWS.
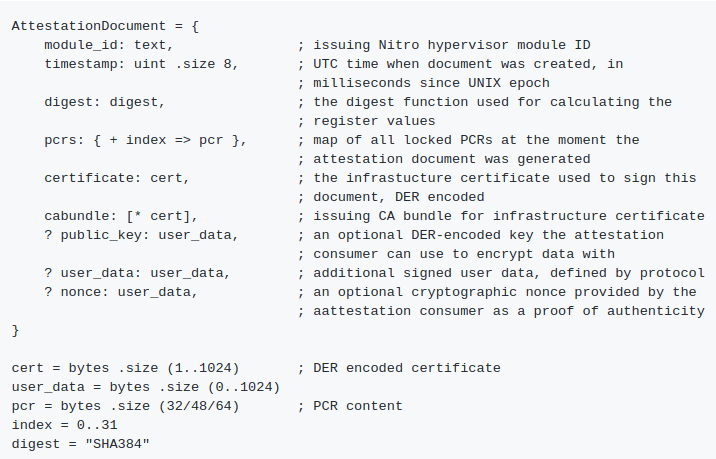
The attestation document is encoded in CBOR and signed using CBOR Object Signing and Encryption (COSE). We will use Python packages cbor2 and cose to do the decoding and signature verification. The detail of the attestation document can be found in AWS documentation.
Structure of the CBOR object containing attestation document
To get the attestation document, we need to decode the CBOR object and get the third value of the object.
# Decode CBOR attestation document
data = cbor2.loads(attestation_doc)

# Load and decode document payload
doc = data[2]
doc_obj = cbor2.loads(doc)
Structure of the attestation document
Then, we will get the PCRs values from the document, these values are the measurement of the enclaves.
After we built the server app enclave image, we can get the PCRs values of the image. We can check if the values inside the attestation document match them, to verify that the request is generated by the same enclave image.
For more detail on PCRs, please check the official documentation.
After matching the PCRs, we will verify the signature of the document.
The attestation document is in COSE Sign1 format and signed by a certificate. We can get that certificate from certificate field of the document.
AWS Nitro Enclaves uses ES384 algorithm to sign the document. To verify the signature, we will create an EC2 key by the parameter of the certificate’s public key (i.e. x/y coordinate and curve).
# Get signing certificate from attestation document
cert = crypto.load_certificate(
    crypto.FILETYPE_ASN1,
    doc_obj['certificate']
)

# Get the key parameters from the cert public key
cert_public_numbers = cert.get_pubkey()\
    .to_cryptography_key().public_numbers()
x = long_to_bytes(cert_public_numbers.x)
y = long_to_bytes(cert_public_numbers.y)

# Create the EC2 key from public key parameters
key = EC2(
    alg = CoseAlgorithms.ES384,
    x   = x,
    y   = y,
    crv = CoseEllipticCurves.P_384
)
After constructing the key, we will construct the Sign1 message from the received data, and verify against the EC2 key.
# Get the protected header from attestation document
phdr = cbor2.loads(data[0])

# Construct the Sign1 message
msg = cose.Sign1Message(phdr = phdr, uhdr = data[1], payload = doc)
msg.signature = data[3]

# Verify the signature using the EC2 key
if not msg.verify_signature(key):
    raise Exception("Wrong signature")
The last part of the validation is to verify the certificate itself.
Because we are verifying the signature using the certificate provided in the same document. We need to ensure the certificate itself is valid but not issued by other parties (probably a self-signed certificate by attackers).
To do this, we will verify if the CA bundle provided is signed by the CA root certificate of the AWS Nitro Attestation Public Key Infrastructure (PKI).
The root certificate can be found in AWS documentation.
# Create an X509Store object for the CA bundles
store = crypto.X509Store()

# Create the CA cert object from PEM string,
# and store into X509Store
_cert = crypto.load_certificate(crypto.FILETYPE_PEM, root_cert_pem)
store.add_cert(_cert)

# Get the CA bundle from attestation document
# and store into X509Store
# Except the first certificate, which is the root certificate
for _cert_binary in doc_obj['cabundle'][1:]:
    _cert = crypto.load_certificate(
        crypto.FILETYPE_ASN1,
        _cert_binary
    )
    store.add_cert(_cert)

# Get the X509Store context
store_ctx = crypto.X509StoreContext(store, cert)

# Validate the certificate
# If the cert is invalid, it will raise exception
store_ctx.verify_certificate()
6. Encrypt the secret and send back to the enclave
Before sending back the secret to the enclave, we will encrypt it using the server app’s public key. The key is generated when we start the enclave server app and sent inside the attestation document.
By doing that, we can ensure only the server app can read the secret even though the message is captured by other parties. This is very important because the Nitro Enclave doesn’t have direct network access, the connection between SecretStore and the enclave is most likely going through the EC2 instance, which we don’t want them to read it.
We use the same method as the previous step, decoding the CBOR object, to get the Server app’s public key. Then we use PKCS1_OAEP to encrypt the secret, encode the ciphertext in base64 format, and send it back to the server app.
# Decode CBOR attestation document
data = cbor2.loads(attestation_doc)

# Load and decode document payload
doc = data[2]
doc_obj = cbor2.loads(doc)

# Get the public key from attestation document
public_key_byte = doc_obj['public_key']
public_key = RSA.import_key(public_key_byte)

# Encrypt the plaintext with the public key
# and encode the cipher text in base64
cipher = PKCS1_OAEP.new(public_key)
ciphertext = cipher.encrypt(str.encode(plaintext))

return base64.b64encode(ciphertext).decode()
7. Decrypt the secret and perform business logic on it
After the server app receives SecretStore’s response, it uses its own private key to decrypt the secret. After that, we can perform the business logic on it, and send the result back to the client.
def decrypt(self, ciphertext):
    """
    Decrypt ciphertext using private key
    """
    cipher = PKCS1_OAEP.new(self._rsa_key)
    plaintext = cipher.decrypt(ciphertext)

    return plaintext.decode()

# Decrypt ciphertext using private key
plaintext = nsm_util.decrypt(ciphertext)

# Perform the business logic on the plaintext secret

# Send the plaintext back to client
client_connection.sendall(str.encode(plaintext))
In this demo, we are not going to perform any business logic but directly send the secret back to the client.
Possible use cases
The pattern shown in this demo is useful when we have static secrets that are frequently used. E.g.
-
SSO app secret
-
Certificate private key
Normally, we will keep those secrets inside a separate component. When requests come, it will be processed inside that central component. E.g. when user request SSO login, this request will be redirected to the authenticator, which has access to the SSO app secret.
But after using Nitro Enclaves, we can safely pass the app secret into the enclave and offload the authentication work to it, without exposing the app secret to the server admin.
Furthermore, because we have control of the entire process, we can customize and add business logic into the “SecretStore”, to make it more than just a store.


